sandy vans

SV Side Ladder

$949.00

Pickup available at Sandy Vans HQ

Usually ready in 2-4 days

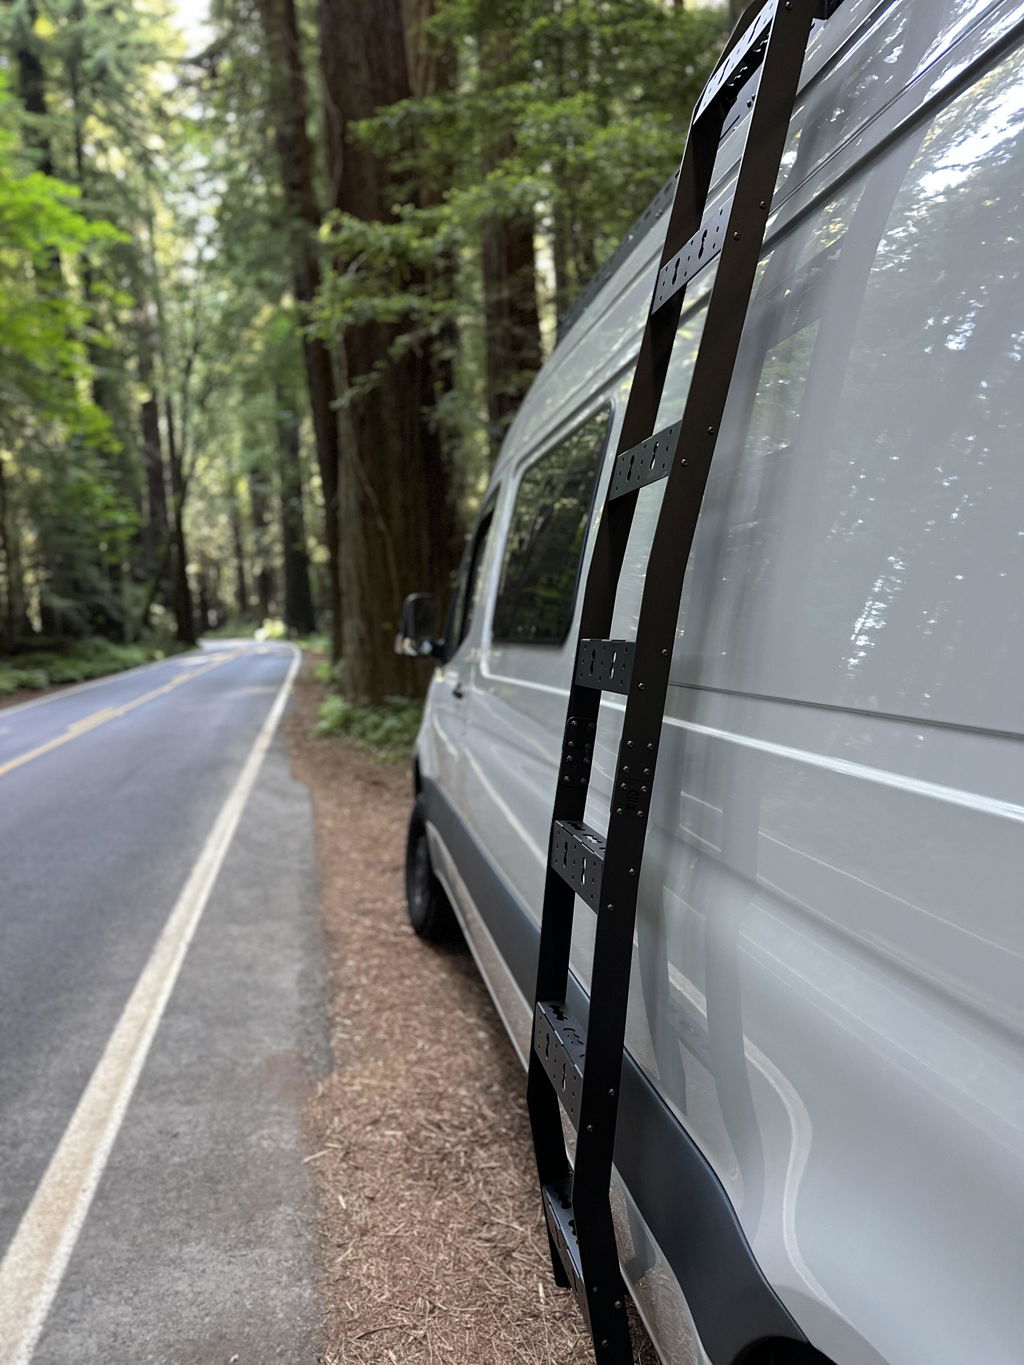
Your roof is prime real estate. The SV Side Ladder is the only thing standing between you and everything you're storing up there — boards, gear boxes, the view from the top at sunset. Built from aluminum, powder coated black, and designed specifically for the Sandy Vans Sandbar Roof Rack, it hooks at the top and bolts through the pinch weld at the bottom. Solid. Clean. Goes up in under an hour.

  • All-aluminum construction — lightweight and rust-proof
  • Textured black powder coat finish
  • 7 rungs with built-in L-track slots on every step
  • Adjustable and removable rungs
  • Modular design — assemble flat on the ground, then hang on the rack
  • DIY install in under an hour
  • Free shipping
  • 1-year warranty

Fits: Mercedes Sprinter 144", 170", and 170" EXT (2007+) with a Sandy Vans Sandbar Roof Rack installed.
Other roof racks: Bracket modification may be required — reach out to our team before ordering and we'll confirm compatibility.

See it on your van. Add the SV Side Ladder to your build in our 3D Van Builder and preview it on a real Sprinter before you buy.

Product Details

Van life runs on access. Roof space is where the boards live, the gear boxes stay dry, and the best moments happen — sitting on top of the van watching the sun drop behind the desert. But only if you can actually get up there.

The SV Side Ladder is Sandy Vans’ purpose-built answer to that problem. Designed to integrate with the Sandbar Roof Rack, it hooks at the top and bolts at the bottom through the pinch weld — no sketchy improvised footholds, no worrying about damaging the side of the van. Seven rungs, each with built-in L-track, give you a solid path to the roof and a mounting surface for anything you want to add later.

Aluminum means it’s light and rust-proof. Powder coated black means it disappears into the exterior. Modular means you assemble it flat on the ground and hang it yourself in under an hour. It’s the kind of exterior piece that looks like it shipped from the factory — because that’s what a well-built Sprinter should feel like.

Fitment & Compatibility

Fits: Mercedes Sprinter (2008+)

Not compatible with: Other roof racks (bracket modification may be required — contact us before ordering)

Also fits these Sprinter-platform RV & upfitter builds:

  • Winnebago Revel
  • Storyteller Overland (MODE, Beast Mode)
  • Outside Van
  • Airstream Interstate & Atlas
  • Grech RV (Strada, Turismo, Terreno)
  • Pleasure-Way Plateau
  • Leisure Travel Vans (Unity, Wonder)
  • Coachmen Galleria
  • Midwest Automotive Designs
  • Jayco Terrain
  • Tiffin Wayfarer
  • Thor Tranquility

Fitment depends on your exact model, year, suspension lift, and body kit. Confirm with our team before ordering.

Not sure your build qualifies? Reach out to our team.

Specifications

MaterialAluminum
FinishPowder coated black
Steps7 rungs
Rung FeatureL-track slots on each rung
Van CompatibilityMercedes Sprinter 144″, 170″ & 170″ EXT (2008+)
Roof Rack RequiredSandy Vans Sandbar Roof Rack
Drilling RequiredYes — 4x 1/4" holes (pinch weld)
Warranty1 year

What's in the Box

  • Lower Arms (x2)
  • Upper Arms (x2)
  • Rungs (x7)
  • Upper Brackets (x2)
  • Joiners (x2)
  • Lower Brackets (x2)
  • 1/4"-20 x 3/4" Button Head Screws (x54)
  • 1/4"-20 x 7/8" Button Head Screws (x4)
  • 1/4"-20 Lock Nuts (x58)
  • 1/4" Washers (x10)
Install Time2–3 hours
DIY FriendlyYes
Drilling RequiredYes — 4x 1/4" holes through the pinch weld (paint holes after drilling to prevent rust)
Pro InstallFree at SV HQ, San Diego

The Side Ladder installs in four stages. Do as much work on the ground as possible before the ladder touches the van — it’s faster, easier, and you’ll get a cleaner result.

Stage 1 — Build the Ladder Sections

Attach the rungs to the lower arms first, then the upper arms. Thread 1/4”-20 x 3/4” button head bolts through each rung and add lock nuts on the back side — leave them slightly loose until all rungs for that section are in place, then tighten both bolts on each rung before moving to the next.

Stage 2 — Join Upper and Lower Sections

Use the two joiners to connect the sections into one full ladder. Bolt each joiner to the upper arm using 4x 1/4”-20 x 3/4” bolts and nuts, then fasten the remaining joiner holes to the lower arm. Repeat on both sides.

Stage 3 — Hang on the Roof Rack

Hook the top of the ladder onto the Sandbar Roof Rack and bolt the upper brackets to the ladder with 1/4”-20 x 3/4” hardware. Slide to your preferred position, then bolt the brackets into the rack to lock it in place.

Stage 4 — Drill and Secure the Pinch Weld

Before marking, confirm the ladder is hanging perfectly straight — if it’s angled now, it’ll be angled permanently. Bolt the lower brackets to the side rails to hold position, then mark the 4 hole locations through the bracket onto the pinch weld.

Move the ladder aside and drill 4x 1/4” holes. Here’s the step people skip: paint or seal the inside of every hole before reinstalling. The drill punches through to bare metal on the pinch weld, and moisture gets in fast. Rattle-can touch-up paint, clear nail polish, or primer all work — don’t skip it or you’ll be dealing with rust from the inside out.

Reinstall the ladder and fasten the lower brackets to the pinch weld using 1/4”-20 x 7/8” hardware with a washer on each side of the pinch weld. Hand tighten all bolts first to confirm square alignment, then fully tighten.

Tools You'll Need

  • Drill
  • 1/4" drill bit
  • 7/16" wrench
  • 5/32" Allen bit for drill (or 5/32" Allen key)
  • Touch-up paint or primer (for sealing drilled holes)

Download the install instructions (PDF)▶ Watch the install video

See all Sandy Vans install videos & manuals →

How to Choose a Side Ladder for Your Sprinter

A side ladder seems simple until you’re standing at a trailhead trying to unload gear from the roof. The differences between options matter more than they look on a spec sheet. Here’s what to actually evaluate.

1. Roof Rack Compatibility — Check This First

Most side ladders are not universal — they’re designed around a specific rack. The SV Side Ladder was built alongside the Sandbar Roof Rack, so the hook, bracket geometry, and mounting points all match without any guesswork. If you’re pairing a ladder with a rack from a different brand, confirm whether adapter hardware exists and what you’ll need to modify. Surprises at install time are expensive.

2. Material — Aluminum vs. Steel

Steel is cheaper to fabricate but rusts. Aluminum adds cost but eliminates the corrosion concern — which matters here because you’re bolting through the pinch weld, an area that sees moisture and road debris. The SV Side Ladder is aluminum throughout. If your van lives outdoors, near the coast, or in a wet climate, aluminum is the right call.

3. Rung Count and Span

Sprinter vans sit high, especially on a suspension lift. A 5-rung ladder that works on a stock-height van can feel short once you’re lifted. The SV Side Ladder’s 7 rungs cover the full height of the Sprinter’s side confidently, whether you’re stock or lifted. Count rungs and check the total span before assuming any ladder reaches the roof comfortably.

4. L-Track Rungs — An Underrated Feature

L-track is the universal mounting currency in van builds. Every rung on the SV Side Ladder has built-in L-track slots, which means you can attach accessories — a step platform, a board carrier, a water bottle holder, anything with an L-track mount — directly to the ladder. Most ladders are just rungs. This one is also a mounting surface.

5. DIY vs. Professional Install

Any side ladder that bolts through the pinch weld involves drilling into your van. That’s not difficult, but it is permanent — get the alignment right before you drill. The SV Side Ladder is designed for solo DIY: the modular build means you assemble the full ladder on the ground first, so you’re only managing positioning and drilling once it’s hanging in the right spot. If you’d rather have Sandy Vans handle it, free professional installation is available. Call (619) 812-1903 to schedule.

6. Flat Ladder vs. Tubular Ladder — Know the Difference

Side ladders come in two constructions: flat (extrusion-style) and tubular (round tube). The SV Side Ladder is flat — the arms and rungs are aluminum extrusions, not round tube. That distinction matters for accessories. Clamp-style mounts, pipe collars, and hardware designed for round tube rails won’t fit this ladder. When adding accessories — a step platform, a board carrier, or anything that attaches to the ladder itself — confirm it specifies compatibility with flat or extrusion-style ladders. Everything in the Sandy Vans accessory lineup is designed to work with this system.

Pre-Order Checklist

  • Do you have the Sandy Vans Sandbar Roof Rack installed? (Required for the top mount)
  • Is your van a 2007+ Mercedes Sprinter in 144”, 170”, or 170 EXT wheelbase?
  • Do you have a drill and a 1/4” bit? (For the 4 pinch weld holes)
  • Have you decided which side of the van the ladder goes on?

Why the SV Side Ladder

Purpose-built for the Sandbar Roof Rack so every bracket, hook, and bolt lines up. Aluminum throughout, so no rust risk at the pinch weld mount. Seven L-track rungs give you both a ladder and a modular mounting surface. Flat extrusion construction — purpose-built for this system, not retrofitted from round-tube hardware. And free professional install means you don’t have to drill if you’d rather not. Reach out at contact@sandyvans.com or (619) 812-1903 with questions before you order.

Does the SV Side Ladder fit my roof rack?
The Side Ladder is designed to work with the Sandy Vans Sandbar Roof Rack. If you have a different rack, bracket modification may be required. Reach out to our team at contact@sandyvans.com or (619) 812-1903 before ordering and we'll confirm compatibility.
What wheelbase Sprinters does this fit?
The SV Side Ladder fits Mercedes Sprinter vans in 144", 170", and 170 EXT wheelbases, model year 2007 and newer.
Will I need to drill to install this?
Yes — the lower bracket mounts through 4x 1/4" holes drilled into your van's pinch weld. No drilling is required at the top; the ladder hooks directly onto the Sandbar Roof Rack. Paint or seal the inside of the drilled holes immediately after drilling to prevent rust on the bare metal.
Can I install this myself?
Absolutely. The ladder assembles flat on the ground first, hooks onto the roof rack, and then the lower bracket is bolted through the pinch weld. Most DIYers wrap it up in under an hour using a drill, 7/16" wrench, and a 5/32" Allen key or bit. Free professional installation is also available through Sandy Vans — call us at (619) 812-1903.
Are the rungs adjustable or removable?
Yes. All 7 rungs are both adjustable in position and fully removable. Each rung also features built-in L-track slots, giving you attachment points for accessories — gear carriers, platforms, or anything else you want to mount on the way up.
Is this a flat ladder or a tubular ladder?
The SV Side Ladder is a flat (extrusion-style) ladder — the arms and rungs are aluminum extrusions, not round tube. This matters when adding accessories: clamp-style mounts, pipe collars, and hardware designed for round tube ladders won't fit. When shopping for add-ons (step platforms, board carriers, or anything that attaches to the ladder), confirm it specifies compatibility with flat or extrusion-style ladders. Everything in the Sandy Vans accessory lineup is built for this system.

Still have a question? Email the team and you'll get a real answer.

Watch the Install

SV Side Ladder $949.00