

There is a moment most van owners can describe exactly. It is 3pm in August, the van has been sitting in the sun for six hours, and the inside is somewhere north of 105°F. A fan does nothing. Opening the doors does nothing. You either drive to find cooler air, or you give up on the van until sunset.
Air conditioning is the fix, and it is also the single most over-researched and most regretted purchase in the van build world. People spend months on their electrical system, their insulation, their cabinetry, and then buy an AC that is either too small to keep up, too power hungry to run overnight, or mounted in the one spot they later needed for something else.
This article covers the decision in the order it actually matters: how the system works, how many BTU you need, the choice between shore-power and battery-powered units, the four places you can physically put the unit, and what it takes to power one off your batteries. We carry Velit, Dometic, and Cruise-n-Comfort at Sandy Vans, and we will tell you plainly where each one fits. But the framework comes first, because the right answer depends on your van, your climate, and your battery bank, not on which brand has the best photos.
1. How does a van air conditioner actually work?
Every air conditioner, in your house or in your van, does one job: it moves heat from inside to outside. It does not create cold. It relocates heat.
Four parts do the work, and every AC on the market has all four somewhere:
- Compressor. Squeezes refrigerant gas, which makes it hot and high pressure. This is the part that draws almost all of your power.
- Condenser. A radiator with a fan. Hot refrigerant passes through, dumps its heat to the outside air, and turns back into a liquid.
- Evaporator. A second radiator, this one inside the van. Liquid refrigerant expands here, gets very cold, and a blower pushes your cabin air across it.
- Blower and controls. Moves the cooled air where you want it, and cycles the compressor to hold a set temperature.
Two consequences fall out of that, and they explain almost every complaint you will read on a forum.
First, the heat has to go somewhere outside. If the condenser cannot breathe, because it is packed with road grime, tucked into a dead air pocket, or sitting on black asphalt in still air, the whole system loses capacity. Second, the compressor is an electrical load in the hundreds of watts, running for hours. That is not a load you add to an existing system casually.
The only real design difference between products is where those four parts live. That is the whole story of rooftop versus under-bench versus undermount.

2. How many BTU do you need for a van?
This is the question people skip, and it is the one that decides whether you are happy. BTU is a measure of how much heat the unit can move per hour. More BTU means more cooling and more amps.
Start with a warning about product names. Several units in this category are named for their wattage, not their BTU. A "2000" in the model name usually means roughly 2,000 watts of input power, not 2,000 BTU of cooling. The conversion is 3.412 BTU per watt-hour, so the numbers are nowhere near each other. The Dometic RTX 2000 is rated around 6,824 BTU. The Velit 2000R is rated 8,000 BTU. Always look up the BTU figure rather than reading the model number.
The rough sizing bands
Published guidance for vans and small RVs lands in these ranges:
- 4,000 to 7,000 BTU: small, well-insulated vans, mild to moderate climates, occasional use. Around 8,000 BTU is the common recommendation for a van in the 100 to 110 square foot range.
- 8,000 to 10,000 BTU: the practical sweet spot for a fully built high-roof Sprinter used in real summer heat.
- 10,000 BTU and up: large builds, full-timers, desert Southwest, pets left in the van, or anyone who wants the unit to hold temperature instead of just fighting the heat.
Our own recommendation, based on the builds we do, is that a 144" high roof in a moderate climate is fine at 8,000 BTU, a 170" build should start at 8,000 and go to 10,000 if you spend time in Arizona, Texas, or the Central Valley, and a 170" extended with a lot of glass should be at 10,000 or above. Treat that as our opinion from building Sprinters, not as a published standard.
What actually moves the number
Square footage is the starting point, not the answer. These push your requirement up:
- Poor or missing insulation. The single biggest factor. An uninsulated van will defeat any AC you can fit.
- Window area. Glass is a heat pump pointed at you. Large windows without insulated covers can undo a whole BTU tier.
- A dark roof or dark paint. A black van in the sun is a different thermal problem than a white one.
- Humidity. In the Southeast, a large share of the unit's capacity goes to pulling water out of the air rather than dropping temperature. The thermometer moves slower than you expect.
- Occupants, pets, and cooking. Two adults and a dog are a few hundred watts of heat on their own. An induction burner or a propane stove is far more.
Why bigger is not automatically better
On a DC system, oversizing has real costs. A unit with far more capacity than the space needs will satisfy the thermostat quickly, shut off, and restart a few minutes later. That short cycling means the highest-current part of the duty cycle happens over and over, it dehumidifies poorly because the evaporator never stays cold long enough to condense much water, and it can feel clammy even at a good temperature. Undersizing has the opposite failure: the compressor simply never stops, which is hard on the battery bank and gives you no headroom on the worst afternoon of the year.
How to choose: pick the BTU tier that matches your van length and climate, then be honest about your insulation and window coverings before going up a tier. If the choice is between spending on a bigger unit or spending on insulation and window covers, insulation wins almost every time.
3. Do you need a 12V DC unit or a 120V AC unit?
Before mounting style, there is a more basic split in this market, and it decides everything downstream.
120V AC units are traditional RV air conditioners. They are the big domed boxes you see on travel trailers and Class C motorhomes. They deliver a lot of cooling for the money, often 13,500 or 15,000 BTU for a fraction of what a DC unit costs, and they have been made in volume for decades so they are cheap and well understood. The catch is total: they need shore power or a generator. Running one off your batteries means a large inverter, significant conversion losses, and a startup surge that a modest inverter cannot handle without a soft-start device. If you spend your nights in campgrounds with hookups, a 120V unit is the most cooling per dollar you can buy. If you spend your nights on public land, it is a paperweight.
12V, 24V, and 48V DC units run directly off the battery bank with no inverter in the path. That is the entire reason they exist and the reason they cost two to three times as much for less cooling capacity. They are built for boondocking, and every product in the rest of this article is one.
How to choose: if you will always have hookups, look hard at 120V and put the savings into anything else. If you intend to sleep off-grid with the AC running, it has to be DC. There is no middle answer that works well.
4. Where can you mount a van air conditioner?
Same refrigeration cycle, four different physical layouts. This is where most of the regret happens, because the decision is permanent once you cut a hole.
Rooftop (self-contained)
Everything, compressor and condenser and evaporator, lives in one housing that sits over a roof opening. The vast majority of van AC sold is this style, and for good reason: it is one hole, one unit, one wiring run, and no interior cabinetry to give up.
Check the cutout before you buy. Many DC rooftop units drop into the standard 14" x 14" vent opening, so if you already have a roof fan there, the hole exists. But not all of them do. Several units, including the Dometic RTX line, need a larger or differently proportioned opening, and 120V RV units are larger still. Enlarging an opening is a one-way operation, so confirm the exact dimension in the manual for the specific model you are buying rather than assuming 14" x 14" is universal. If you are switching from a fan to an AC, also confirm whether the unit needs a thicker or thinner roof sandwich than what you have.
What you give up. Roof real estate is the big one. A 14" x 14" footprint plus service clearance is roughly one large solar panel you no longer get to mount, and people who plan their solar array before their AC end up unhappy. Height is the second: these add several inches above the roof, and on an already-tall high roof Sprinter that matters for parking structures, garages, and drive-through car washes. Third is noise position. The condenser fan and compressor are directly above your head, usually above the bed, which is exactly where you notice it at 2am.

Suits: most builds. If you do not have a specific reason to do something else, rooftop is the default and the easiest to service.
Under-bench (interior mounted)
The unit lives inside the van, typically built into a bench seat, a bed base, or the garage, with intake and outlet ducted to where you want the air. Exterior vents in the floor or a lower side panel let the condenser breathe.
What you gain. Your roof stays completely clear, which is the whole point for anyone running a full solar array or a roof rack with a deck. The exterior stays visually stock, which matters if you street park in cities and do not want a unit announcing that someone is living in the van. Vehicle height is unchanged. And because the compressor is low and behind cabinetry rather than directly above your pillow, the noise character is different, though not necessarily quieter.
What you give up. Interior volume, and a meaningful amount of it. You are handing over a chunk of bench or garage space permanently, along with duct runs. The ducting itself is where installs go wrong: long runs, tight bends, and uninsulated duct all cost you cooling, and any duct passing through a warm space needs insulation or it delivers lukewarm air. You also have to get condenser airflow right through the floor or side vents, and a unit that recirculates its own hot exhaust will underperform on exactly the days you need it.

Suits: builds where the roof is already committed to solar, stealth-focused builds, and anyone who cannot afford the extra exterior height.
Undermount (below the floor)
The condenser, and sometimes the compressor with it, mounts underneath the van on the chassis. The evaporator and blower go inside, often in a headliner shelf or an overhead cabinet, connected by refrigerant lines. From outside, the van looks completely unmodified.
What you gain. The cleanest possible exterior and a fully free roof. Nothing added to vehicle height at all. Because the heat-rejecting half of the system is completely outside the living space, and the noisy compressor is under the floor rather than over the bed, this layout can be the quietest option inside. For a build with a full solar roof, an awning, a rack, and a deck, it is often the only way to fit AC at all.
What you give up. Exposure. The condenser is now in the same environment as your exhaust and your brake lines: road spray, salt, gravel, mud, and standing water. Two specific consequences are worth taking seriously. Fouled condenser fins can cost 20 to 30 percent of efficiency, so this layout demands that you actually rinse the fins out, and a rock guard is not optional equipment. Refrigerant lines running under the vehicle are exposed to debris strikes in a way rooftop lines never are. There is also an airflow problem unique to being parked: under the van, on hot pavement, with no vehicle motion, the air around the condenser can go stagnant, which is why the good undermount systems use dual condenser fans rather than one.
Install complexity is also the highest of the four. This is not a bolt-on. It involves under-vehicle mounting, refrigerant line routing, and an interior evaporator location that has to be built for.
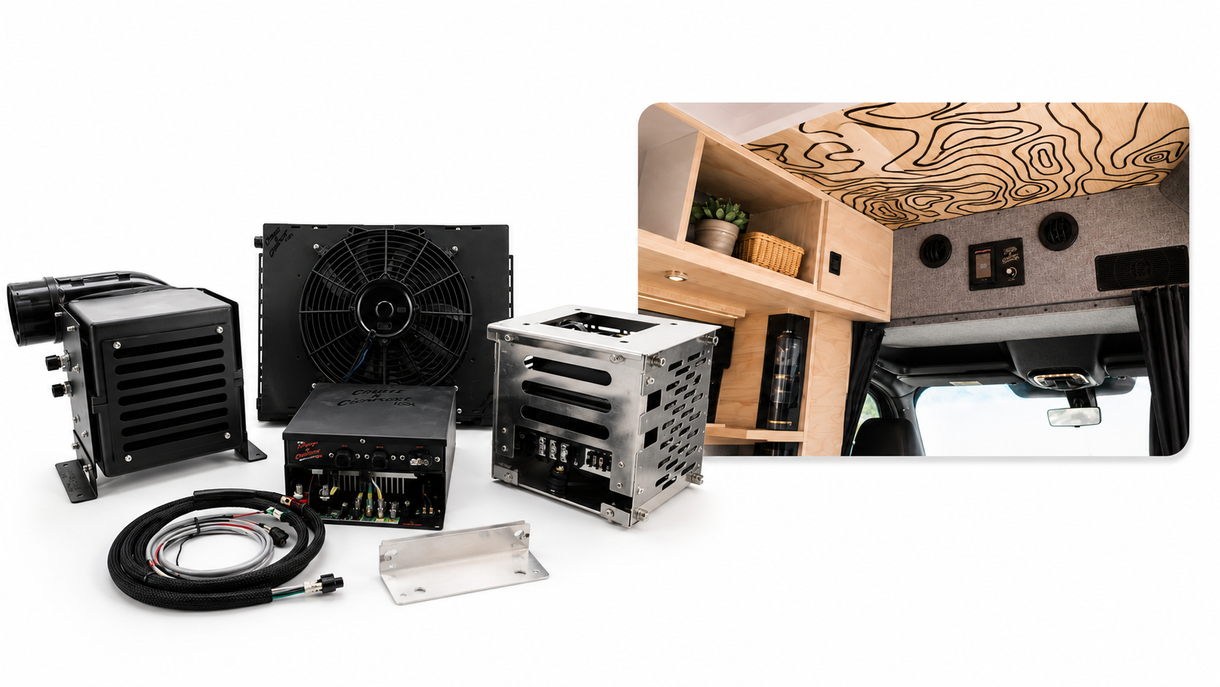
Suits: builds that have already committed the roof, owners who want a stealth or stock-looking exterior, and people willing to accept a more involved install and some maintenance in exchange for a clear roof and a quiet cabin.
Portable (freestanding)
A self-contained box that sits on the floor or outside the van, with a hose or two for exhaust. Nothing is cut, nothing is permanent, and it can come out when summer ends.
What you gain. No modification to the vehicle, no resale concern, and the lowest entry cost. If you rent, or if the van is a lease, or if you only need cooling three weekends a year, this is a reasonable answer.
What you give up. Cooling capacity and runtime, both meaningfully. Single-hose portable units also work against themselves: pulling cabin air to cool the condenser and blowing it outside creates negative pressure, so hot outside air gets drawn in through every gap in the van to replace it. They occupy floor space you have to walk around, and they need somewhere for condensate to go. Owner reports on portables are consistent and worth listening to: they drop the interior by roughly 10 to 15 degrees, which is real relief and also not the same thing as holding a set temperature.
Suits: occasional use, rentals, unmodifiable vehicles, and anyone testing whether they want AC before committing to a hole in the roof.
How to choose: answer one question first, before you look at any product. What is your roof for? If the answer is solar and racks, you are shopping under-bench or undermount. If the roof is available, buy rooftop and spend the difference on battery capacity.
5. Can you run a van air conditioner overnight on batteries?
Nothing about a van AC is hard except powering it. This is the section to read twice.
Duty cycle is the whole calculation
The unit's amp draw only tells you consumption while the compressor is running. What matters is the percentage of each hour it actually runs, and that swings enormously:
- 95°F outside, holding 70°F inside: expect an 80 to 90 percent duty cycle. The compressor is basically always on.
- A mild 75°F night: 20 to 30 percent. It cycles, and consumption drops by a factor of three or four.
That is why "how long will it run on my battery" has no single answer, and why anyone who quotes you one number is guessing.
The overnight math
Here is the arithmetic, stated with assumptions visible. Take a 12V unit drawing 40A while running. On a warm night at a 50 percent duty cycle, average consumption is 20A, or 20Ah per hour. Over eight hours of sleep, that is 160Ah.
Now apply that to a battery bank. LiFePO4 gives you most of its rated capacity usefully, so a 200Ah bank has roughly 180Ah available. That covers the night with almost nothing left for the fridge, lights, and phones, and nothing left as margin if the night is hotter than you assumed. A 400Ah bank covers the same night comfortably and leaves headroom. Push the duty cycle to 80 percent on a genuinely hot night and consumption goes to 32A average, 256Ah over eight hours, and a 400Ah bank is now the minimum rather than the comfortable choice.
Published guidance lines up with that: roughly 200Ah of LiFePO4 for occasional overnight use in mild temperatures, 300 to 400Ah for regular overnight use in warm weather, and 400Ah or more for full-day cooling in hot climates. Those figures are for the AC alone and do not include induction cooking or other heavy loads.
AGM batteries are not suitable for this. You can only use about half of an AGM bank's rated capacity before damaging it, which means a 640Ah AGM bank behaves like a 320Ah bank, at several times the weight. For AC, use lithium.
Solar will not run your AC overnight
Solar is a daytime offset, not a battery replacement. A rooftop array in strong summer sun contributes real energy during the hours the AC is working hardest, which is genuinely useful, but production goes to zero at exactly the hour you want to sleep in a cool van. Plan the battery bank for the night and let solar reduce how deep you go each day. Driving helps more than most people expect: a DC-DC charger pulling from the alternator can put a serious amount back in during a few hours of highway.
Wiring is the most common actual failure
When someone says their AC "does not work," "cuts out," or "was never as cold as it should be," the cause is very often wire size rather than the unit. A 40 to 60A DC load over a 15 to 20 foot round trip needs heavy cable to stay inside a 3 percent voltage drop. Undersize it and you get low voltage at the compressor, which produces exactly the symptoms people blame on the AC: it trips its own low-voltage cutout, it starts weakly, it never reaches rated output, and the cable gets warm.
Follow the manufacturer's gauge and fuse spec for your actual run length rather than the minimum in the manual, use a proper ANL or MRBF fuse at the battery, and measure voltage at the unit with the compressor running. If you see meaningful sag, the wire is the problem.
6. Should you go 12V, 24V, or 48V?
Having settled on DC, there is one more electrical choice. Same cooling, same watts, very different current. Doubling system voltage halves the amps for the same power, and going to 48V quarters it. Concretely, a unit that pulls around 20A in eco mode at 12V pulls roughly 5A at 48V.
Lower current means smaller, cheaper, easier cable, less voltage drop over the same distance, smaller fuses, and less heat in the wiring. For an undermount or under-bench install with a long run from the battery, that difference is significant.
The catch is that your whole system has to be built for it. Choosing 24V or 48V affects your batteries, your inverter, your solar charge controller, your DC-DC charger, and every 12V accessory in the van, which then needs a converter. It is a straightforward choice on a new build and an expensive one on a retrofit.
How to choose: if your electrical system already exists and it is 12V, buy the 12V unit and size the cable correctly. If you are designing the system from scratch around AC as a primary load, 24V or 48V is worth serious consideration before you buy a single battery.
7. What actually goes wrong with van air conditioners?
These are the ones that come up again and again from owners after the first summer.
- Roof real estate you already spent. People install solar first, then discover the only remaining clear span is too small for an AC. Lay out the roof completely on paper, AC and fan and solar and racks together, before drilling anything.
- Condensate going the wrong way. An AC pulls water out of the air continuously and it has to drain. Blocked or badly routed drains show up as water inside the van, usually at the worst possible time. Check and clear the drain path seasonally.
- Night noise. Interior decibel ratings are measured at a distance, not from a pillow 18 inches below the unit. If you sleep light, the location of the compressor matters as much as its rating.
- Vehicle height you forgot about. Measure the finished height with the unit on and write it somewhere you will see it. Parking structures and older garages are not forgiving.
- Dirty condenser fins. This applies to every layout and is worst on undermount. It is the cheapest possible maintenance and the most commonly skipped.
- Expecting house AC. A battery-powered van AC will not hold 68°F when it is 105°F outside and the van is parked in full sun with mediocre insulation. It will make the van livable. Park in shade, cover the windows, and it will do considerably better.
- Service and support after the sale. Worth thinking about before you buy. A unit that is easy to get parts for, from a company that answers the phone, is worth more than a spec sheet advantage.
8. What should you check before you order?
You should be able to answer all of these. If you cannot answer one, that is the thing to sort out before you spend money.
- What is my interior square footage, and what BTU tier does that put me in?
- How is my van insulated, and do my windows have insulated covers?
- What is the hottest place I will realistically use this, and is it humid or dry?
- Will I always have shore power, or do I need this to run off batteries?
- What is my roof already committed to, drawn to scale?
- What exact roof opening does the unit I want require, and what do I have now?
- What is my battery bank in usable amp-hours, and is it lithium?
- What duty cycle should I plan for, and what does that mean for overnight amp-hours?
- What is my system voltage, and is that fixed?
- How long is the cable run from battery to unit, and what gauge and fuse does that require?
- What is my finished vehicle height with the unit installed?
- Where does condensate drain, and can I get to it to clean it?
- Who supports this product in two years, and where does it get serviced?
9. What does Sandy Vans carry, and why?
We stock three brands, all of them DC, and we think of them as three tiers. This is not a ranking of which company is best in the abstract. It is how we actually spec them into builds.
Standard: Velit 2000R

The Velit 2000R is what goes into our standard layout builds. It is 8,000 BTU, available in 12V, 24V, and 48V, and it drops into a standard 14" x 14" opening with a low profile of roughly 7 inches above the roof. It uses R32 refrigerant and is TÜV Rheinland certified, and it comes with a one-year limited warranty.
The reason it is our default is that it hits the capacity most Sprinter builds need at the best value in the category, and the multi-voltage option means we can put the same unit in a 12V build or a 48V build without changing the layout. Velit is a newer name in the US market than Dometic or Cruise-n-Comfort, so there is less decade-long community history on it, and we will say that plainly. What we have seen in our own builds has been good.
The Velit line has three other configurations we carry, and they solve specific problems:
- Velit 2000U, the under-bench version. Same 8,000 BTU and same voltage options, mounted inside instead of on the roof. This is the answer when the roof is fully committed to solar but you do not want the complexity of an undermount install.
- Velit 2000R Mini, a smaller-footprint rooftop unit in 12V and 48V, for tighter roofs and smaller builds.
- Velit 3000R, the higher-output rooftop unit in 24V and 48V, for large builds and hot climates.
Upgrade: Dometic RTX 2000

The Dometic RTX 2000 is our upgrade pick, and the reason is track record rather than raw specs. Dometic is the most recognized name in van AC in North America, the RTX 2000 has been in the market long enough that owners have reported back over multiple seasons, and parts and service are easier to find than for anything else in the category. If you want the known quantity, this is it.
On paper it is around 6,824 BTU and draws roughly 19 amps in eco mode, so it is a slightly lower output number than the Velit 2000R at a higher price. What you are buying is the maturity of the platform and the support network behind it.
One install note that catches people out: the RTX does not simply drop into a standard 14" x 14" vent hole the way most of its competitors do. It has its own opening requirement, which is why we sell a Dometic RTX trim kit and a premium install kit with the correct wire harness. Confirm the opening dimension against the manual before you cut. Builders in longer vans have also reported that cooling distribution can be uneven without supplemental circulation fans, which is a layout consideration rather than a fault.
Ultimate: Cruise-n-Comfort, built into the overhead shelf

Cruise-n-Comfort is our top tier. They build and service their units in Arizona, they have been doing DC air conditioning for commercial and specialty vehicles far longer than the van market has existed, and their reputation for holding up over years is the strongest in this category. That is why they are the system we put in a build where the owner does not want to think about the AC again.
Two configurations:
The Cruise-n-Comfort HD R/T is the rooftop version. All-aluminum, black powder-coated, available in 12V or 24V across two output tiers, reaching up to 11,000 BTU on the 24V large unit, which is the most cooling capacity of anything we carry. It uses R513a refrigerant, ships pre-charged by FedEx Ground rather than freight, and drops into a standard 14" x 14" opening. No HVAC technician is required to install it, and it is genuinely DIY-friendly. Sandy Vans installation is available by request.

The Cruise-n-Comfort VES Icebox overhead shelf kit is the undermount version, and it is the product we collaborated with Cruise-n-Comfort to create. The dual-fan condenser mounts below the van behind a rock guard, and the evaporator and blower are built into an overhead shelf we designed for the Sprinter headliner. That gives you 10,000 BTU on 12V with a completely clear roof, no added vehicle height, and the compressor noise out of the sleeping area. It is the answer for a build with a full solar roof, or for anyone who wants the exterior to look stock.
Lead time on both Cruise-n-Comfort systems is 4 to 5 weeks from order. On the VES Icebox, Sandy Vans facilitates the order and supports you through the install, and Chris at Cruise-n-Comfort handles ongoing product support once it is running.
Putting it together
If you have a 12V system, an available roof, and a normal build, start at the Velit 2000R. If your roof is spoken for and you would rather give up bench space than cut it, the Velit 2000U is the same capacity mounted inside. Tight roof or smaller van, look at the Velit 2000R Mini. Big build in serious heat on a 24V or 48V system, the Velit 3000R.
If you want the most established platform and the deepest support network, step up to the Dometic RTX 2000, and plan on the trim kit and premium install kit with it.
If you want maximum capacity, go to the Cruise-n-Comfort HD R/T. If you want a clear roof, a stock-looking van, and the quietest cabin we can build, go to the Cruise-n-Comfort VES Icebox overhead shelf kit.
Not sure which fits your build? Use the Van Builder to see your options, browse the full heating, cooling, and ventilation collection, or just reach out and tell us your van length, battery bank, and where you spend your summers. That is genuinely all we need to point you at the right one.
10. Van air conditioning FAQ
How many BTU do I need for a camper van?
Published guidance puts small, well-insulated vans in mild climates at 4,000 to 7,000 BTU, with around 8,000 BTU commonly recommended for a van in the 100 to 110 square foot range. A fully built high-roof Sprinter used in real summer heat is best served by 8,000 to 10,000 BTU, and large builds, full-timers, or desert use should be at 10,000 BTU or above. Insulation quality, window area, and humidity move the requirement more than square footage alone.
Can a 12V air conditioner run all night on batteries?
Yes, with enough lithium capacity. The math depends on duty cycle, which is the share of each hour the compressor actually runs. A 12V unit drawing 40A at a 50 percent duty cycle averages 20Ah per hour, or about 160Ah over eight hours. On a genuinely hot night at an 80 percent duty cycle, that same unit needs closer to 256Ah. Plan on roughly 200Ah of LiFePO4 for occasional mild-weather nights, 300 to 400Ah for regular warm-weather use, and 400Ah or more for hot climates. AGM batteries are not suitable, because you can only use about half their rated capacity.
Do all van air conditioners fit a standard 14x14 roof opening?
No. Many DC rooftop units do drop into the standard 14" x 14" vent opening, which is why swapping a roof fan for an AC is often straightforward. But several units, including the Dometic RTX line, require a larger or differently proportioned cutout, and 120V RV air conditioners are larger still. Always confirm the exact opening dimension in the manual for the specific model before cutting, since enlarging a hole is a one-way operation.
Is a 120V RV air conditioner better than a 12V DC unit?
It depends entirely on where you sleep. A 120V unit gives you far more cooling per dollar, often 13,500 to 15,000 BTU for a fraction of the price of a DC unit, but it needs shore power or a generator. A 12V, 24V, or 48V DC unit runs straight off the battery bank with no inverter in the path, which is why it costs two to three times as much for less capacity. If you always have hookups, 120V is the better value. If you sleep off-grid with the AC running, it has to be DC.
What is the difference between rooftop, under-bench, and undermount van AC?
It is a question of where the components live. A rooftop unit puts everything in one housing over a roof opening, which is the simplest install but costs you roof space for solar and adds several inches of vehicle height. An under-bench unit mounts inside a bench, bed base, or garage with ducted air, which frees the roof entirely but consumes interior volume and depends on good duct runs. An undermount system puts the condenser below the chassis with the evaporator inside, giving the cleanest exterior, no added height, and the quietest cabin, in exchange for the most complex install and exposure of the condenser to road spray and debris.
Why is my van air conditioner not cooling properly?
The most common cause is undersized wiring rather than a fault in the unit. A 40 to 60A DC load over a 15 to 20 foot round trip needs heavy cable to stay within a 3 percent voltage drop. Too small a cable means low voltage at the compressor, which produces exactly the symptoms owners blame on the AC: weak startup, never reaching rated output, and tripping its own low-voltage cutout. The second most common cause is a fouled condenser, where dirty fins can cost 20 to 30 percent of efficiency. Measure voltage at the unit with the compressor running, and clean the condenser fins seasonally.
Will solar panels run my van air conditioner?
Solar offsets daytime consumption but will not run an AC overnight. A rooftop array contributes real energy during the hours the AC works hardest, which meaningfully reduces how deep you draw down the bank each day, but production is zero at night. Size the battery bank for the overnight load and treat solar as a daytime recharge. A DC-DC charger pulling from the alternator while driving typically puts back more in a few hours than people expect.
Should I choose a 12V, 24V, or 48V air conditioner?
Same cooling and same wattage, very different current. Doubling system voltage halves the amps, and 48V quarters them, so a unit pulling around 20A in eco mode at 12V pulls roughly 5A at 48V. Lower current means smaller cable, less voltage drop, and smaller fuses, which matters most on long runs for under-bench and undermount installs. The catch is that system voltage affects your batteries, inverter, charge controller, and every 12V accessory. It is an easy choice on a new build and an expensive one as a retrofit, so if your 12V system already exists, buy the 12V unit and size the cable correctly.
Does an air conditioner make a van as cool as a house?
No, and expecting that is the most common source of disappointment. A battery-powered van AC will not hold 68°F when it is 105°F outside and the van is parked in full sun with mediocre insulation. It will make the van livable. Park in shade, cover the windows with insulated covers, and the same unit performs considerably better.
Questions about sizing, wiring, or which system fits your build? Reach us at contact@sandyvans.com or (619) 812-1903. We build Sprinters in San Diego and we install these systems ourselves, so if something in here does not match your van, tell us what you are working with and we will give you a straight answer.


